- You are here:
- Home »
- Blog »
- Table Saw
- » DIY Table Saw Fence

DIY Table Saw Fence
Aside from the saw blade, one of the most important parts of any table saw system, is the guide/stop that is used to set the length of the cut. Also known as the “Fence”, this is an essential component for ensuring both a precise singular cut, as well as consistently sized multiple consecutive cuts. Extension fences for ripping longer lengths of timber, and pre-made replacement fences can be bought for a few hundred dollars on average. Or if you are more of the hands one type, and would like to save some money in the process, there is always the DIY option available to you when replacing your existing table saw fence.
The Minimalist Design
Requires:
- 1 x piece of timber the length of the saw table.
- 2 x clamps large enough to grip the table plus the timber.
If you tend to mark and cut each piece of timber instead of using a fence guide, then either buying a new fence or making a complex replacement, might not be an ideal option for you. Regardless, trying to cut timber with your hand(s) very close to the blade is dangerous and inadvisable. To this end we would suggest to simply use a length of timber that has be squared off to the blade, positioned at the right length, and held in place by the two clamps.
This is not by any means a precise guide. As the timber could shift position when the clamps are tightened, this could cause longer cuts to be less squared. For this reason, the minimalist design would be best left for smaller ripping jobs, or as a temporary solution, and not as a mainstay.
G-Clamp Fences
Requires:
- 1 x 2×4 0.25-0.5 inch (12.5 mm, 6.5 mm) longer then the table. The main piece needs to be longer then the table to help with placement and removal.
- 2 x (2×2-2×4) as long as the thickness of the table’s edge, plus 5 inches (the height of the main piece of timber + 1 inch of over hang). These two pieces can be as thin as 2×2, if need be.
- 4 x heavy duty deck screws.
- 1 x Star head wing screw. The available lengths may vary at times, if you are unable to find a long enough screw, consider using a threaded rod with a flat knob instead.
- 1 x Insert nut, matching the above thread.
- Wood Glue.
The G-Clamp Fence is a rather quick and easy fence to make. Designed to function like a normal G-clamp, this fence is held in place by pressure provided by a clamping screw. Though simplistic in design, ensuring that both ends are squared, and that the pilot hole for the insert nut is centered to the main timber is vital.
This type of fence is made by firstly cutting the main timber between 1/4 to 1/2 an inch longer then the table. This is done to ensure clearance for the clamping head, making it easy to place and remove the fence. As such, it would be wise to firstly determine the size of the clamping head that is going to be used, and to allow sufficient clearance when it is fully opened.
- With the main timber cut to length, affix a block to one end of the timber by drilling two squared pilot holes through both pieces. Counter sink the screws, apply wood glue, and screw the two pieces together. Keeping the block’s inner face square to the main timber, is more important then its vertical squaring (so long as it is not leaning in). This is because if the timber was twisted off center, then when the clamp is tightened, there is a high probability that the fence would not be squared to the blade, instead twisting to sit flush with the face of the block instead.
- Drill the two pilot holes for the screws in the end block, and counter sink their heads, but do not permanently affix the block just yet.
- Sitting the fence on the table, use a pencil to mark the edge of the under side of the table against this end.
- Now along the corner where this block meets the main timber.
- Remover the screws and determine the center point for the clamping screw. This can be done by drawing a diagonal line from corner to corner.
- Drill a pilot hole with a smaller drill bit to provide a guide to help keep the insert nut squared.
- Using a larger drill bit that is suitable for the size of the insert nut, drill out the rest of the hole.
- Affix the insert nut using either a hex key or screw driver, which ever is most suitable.
- Insert the clamping screw, if you are using a flat knob to cap off the end of a threaded rod, then you need to attack it after the rod has been inserted.
- Another option is to use the rod from a broken G-clamp, as this will also work so long as the insert nut has the appropriate sized thread.
- Apply the wood glue and screw the two pieces together.
- Wipe make sure that you have wiped of any excess glue, and give your new G-Clamp Fence a test run.
- Just give the glue enough time for it to fully cured before applying large amounts of force, just in case.
Making a new Sliding Fence
The next few concepts can use the same basic design for the actual fence body, with their locking anchors being what sets them apart. The two main methods we suggest, is to either make the fence body completely from scratch using nothing but wood, or to use an aluminium bar/channel as its core.
Wooden Fence Body
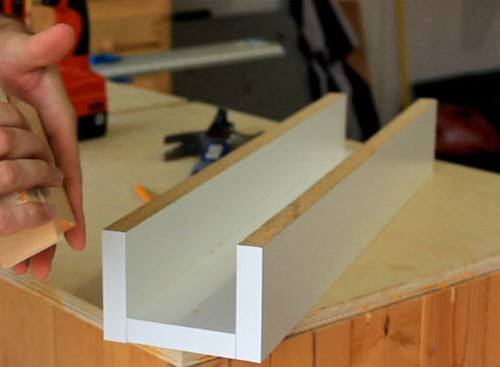
Requires:
- 4 x 1×3’s. The Fourth one may vary in length.
- Off cuts at about 3″ long, and 2″ high. These are to act as bracing for the fence.
- Enough screws to hold everything together.
Cut three of the 1×3’s to the desired length, the fourth needs to be cut to suit the desired anchoring method. This means the that final shape could be a fully enclosed box, or the last few inches near the anchor could remain uncovered. Use your own judgment to determine if you would like to have the end of the fence covered or not.
- Lay one of the 1×3’s, and attach the other two same sized 1×3’s to either side with glue and screws.
- Make sure that they are squared as you attach each side.
- Attach the bracing blocks, with one sitting flush at the end. You will only need to use one screw to attach each of these blocks.
- If you are not going to be fully enclosing the fence, then position one block to sit flush with the end of the shorter 1×3.
- Now attach the shorter 1×3 leaving enough space for you to attach the anchor later.
- Alternatively, if you are fully enclosing the fence, make sure to first attach the anchoring unit.
- Both options will give you a rectangular box that will serve as your new fence
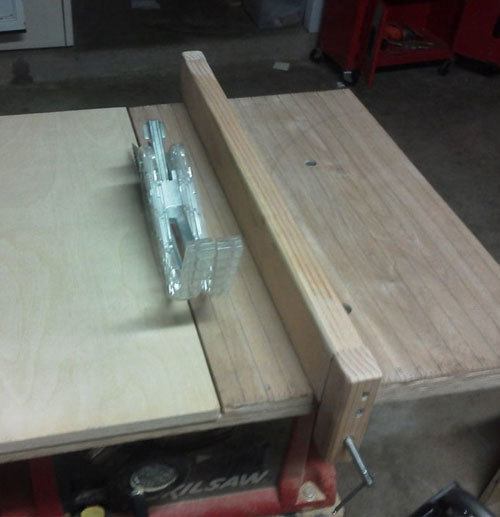
Aluminium Core Body
Requires:
- 1 x Aluminum U bar/channel.
- 2 x timber skirting.
- Screws or nut and bolts.
Using an aluminium U bar/channel for the bulk of your new fence, will greatly cut down on your workload. The hardest part is finding a section that is perfectly straight and not bowed or buckled due to poor storage or manufacturing defects.
- With the flat side of the bar facing down, attach the timber skirting to either side using the screws or nuts and bolts.
- The skirting can help to protect both the working timber from unwanted staining, and the relatively soft aluminum from damage and wear and tear.
- The skirting can be shaped however you like. If you want, give them handles to help you move the fence aground more easily.
- If the aluminium is not perfectly straight or squared, try using the skirting to fix this issue.
- As this type of fence is going to be left open, it is easy to attach the anchor at a later date, or even replace it if need be.
Choosing Your Anchor
Now its time to chose the anchoring system that best suits your needs. There are several designs to choose from, some more complex then others. As we stated above, how you attach your anchor will be dependent on how you’ve designed your fence. Some anchors can be removed, most are a permanent fixture. So careful planning is required when installing them on either the table itself, or your new fence.
T-Track and Guild Rail Anchors
Some table saws have an already existing T-Track or Guild Rail system built in along the length of the table. These are designed to guild their original fences into place. With the right components we can take advantage of these sliders, and make ourselves a new fence.
The main things that could be needed are:
- Screws or nuts and bolts.
- T-track screws and nuts.
- A T-track or a Unistrut P-1000 Guild Rail, existing or new. If new, the appropriate components will be needed to attach the new T-track/Guild Rail to the table saw if one was not present before.
- Possible brackets or block spacers.
- A strip of timber to serve as the T-track backing, if adding a new one.
- A block of solid material that fits within the the track.
We say “could be needed” as the type of locking mechanism you choose, makes the key difference between what is or isn’t needed. Not to mention, that if you are attaching a new guide to a table there will most likely be more parts involved.
Attaching a new T-track or Guide Rail
Most table saws have predrilled holes along the front side of the frame. These are used for adding addition attachments, and as such they make excellent attachment points for your new fence’s guide. There are several ways we can go about doing this:
- We could attach the new guide directly to the unit. This can be fine for most Unistrut P-1000 channels, but most T-Tracks will require a timber backing in order to be attached to the unit’s frame.
- If attaching the guide directly to the unit’s frame, there is a risk that it would not allow the track to be square and leveled. You may need to look at using brackets or blocks to offset this issue.
- Similarly if the frame sits too far under the table top, brackets and blocks could also provide the required spacing needed to clear the tables edge.
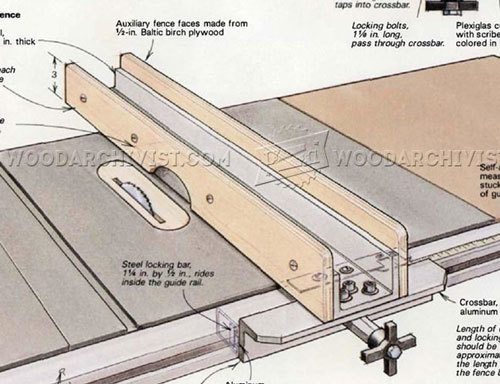
Using a Locking Bar to Anchor the Fence
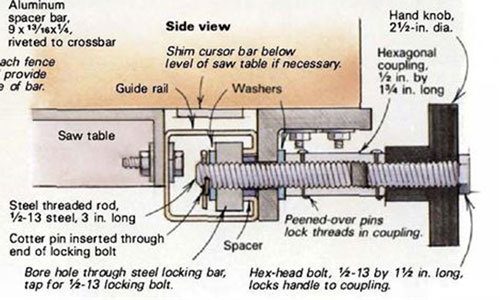
- As seen in the side diagram provided, a “locking bar” is used to apply the pressure needed to secure the fence in place.
- A locking bar is just that, a bar that slides up and down the track, and is pulled against the inside edges of the track as the clamping screw is fastened.
- This is achieved by drilling a hole into the bar and adding a thread that matches the clamping screw.
- If the bar is made of metal, aluminum or solid plastic/perspex, threading can be done directly to the hole with the use of a spiral point tap, thus giving the screw its perch.
- If the block is made of timber however, an insert nut could be used instead.
- The size of the block is determined by both the internal clearance of the track, as well as the width of the slot.
- There needs to be enough clearance for the block to easily slide up and down the track.
- When twisted inside the track (as it’s bound to happen now and then) all corners of the block can not be close to the lip of the run slot.
- So it’s to be small enough to both easily slide up and down the track, yet too big to fall out through the run slot.
- As for the length. Try to match the same length of the block/bracket you have used to attach the locking mechanism to the fence.
- This can help to limit the risk of damaging the run slot when applying the force needed to secure the fence in place.
Using T-track Screws to Anchor the Fence
- Another method is to simply use T-track screws to not only guide the fence, but to also help secure it in place.
- The video below is an excellent example of how to use T-track screws with a block of wood as the attachment.
- As the clamping screw is fastened, it pulls the central T-track screw up against the inside edge of the run slot.
- The two side screws are what help to glide the fence up and down the track.
T-Assembly Anchors
A simplistic yet effective anchor design. The following video shows just how easy it is to make a T-assembly anchor from scratch. Though it’s shown being used on a custom made table, they are still effective enough to be used on any table saw that has a lip along its edges.
The T-assembly caps the fence body off at the end, and uses a custom made G-clamp to lock the fence in place.
More Complex Designs
For the more talented craftsmen, here are a couple of fences that could test your skills. These fence designs take the principle of the other designs mentioned, and step them up a notch. Everything, from the guide rails to the locking mechanisms, are all made from scratch, and use multiple parts in their constructions.
While these fences designs, also incorporate their own designs for their fence bodies, the above mentioned body designs are still compatible with these systems, albeit with some workaround. So if you would rather use an aluminium core, you still can. The same for if you have a favorite body, but need a new guide or anchoring system. Watch the videos to see how they build the anchors to lock the fence in place, and substitute your own fence body where applicable.
The Latch Locking Anchor
Much like the T-assembly, this latch locking anchor, uses the edges under the table saw to securely lock the fence in place. Unlike the T-assembly, this system is a complete unit and doesn’t require any removable parts. Instead the anchor has a latch the pivots down when it’s not engaged, and pulls back up before being locked in place. Though this video demonstrates the fabrication and installation of a new custom guide rail, if your table saw already has a similar edging or guide in place, then the locking mechanism could still work just fine on its own.
For more details on how to make a latch locking anchor, and/or its accompanying glide rail and fence body, please what the video and follow any links that they provide.
Advanced Locking Bars
Drawing inspiration from how the locking bar clamps down against the edge of the run slot of the T-tracks and Unistrut channels, these two videos demonstrate how simply wedging two pieces of angled wood together, can be just as effective. These two designs are the most complex systems that we have come across ourselves.
While simplistic in concept, their well thought out designs and level of ingenuity are astounding and well worth the praise they deserve. For us to attempt to explain what is involved with their fabrication, would not be able to do them justice. Please watch the videos to see just how they have achieved these works of art.
Keep in mind that in order for either of these systems to function properly, they will require a unique guide rail to be built. With that said, you can either follow their instructions on fabricating the fence body, or you can design you own to replace theirs.
Finishing Touches
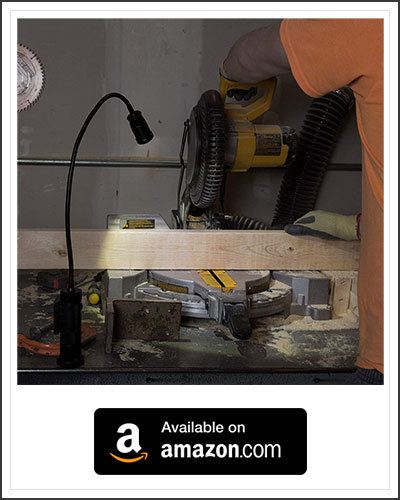
To finish off your new table saw fence, there are many practical, or even cosmetic options available to you. We ourselves prefer the practical over the cosmetic, but each to their own. As such, here are our preferred adhesive measuring tape to help gauge your cuts, and a mobile L.E.D Lamp that can be placed on either the table itself, or the fence body to help bring some light to those poorly light areas.
Also, if you find that there is still a little movement at the far end of your new fence, try attaching a catch stop block to that end. As the fence is tightened at one end, this block would grip the table at the other. Just make sure that it is squared to the fence body though.