- You are here:
- Home »
- Blog »
- How-To
- » How to Replace a Chainsaw Chain

How to Replace a Chainsaw Chain
There are many different reasons why you may want to replace or remove the chain or guide bar of your chainsaw. Maybe the blades are blunt or broken. Perhaps you want to give the chainsaw a thorough cleaning and inspection. Or maybe you need to replace the guide bar or a chain to cut through different types of materials. Then again, you might just want to put the chainsaw away for long term storage.
No matter the reason, by following our quick and easy, step by step guide for removing and replacing a chainsaw’s chain and guide bar; not only will you be able to replace your own chains, but you will also be able to clean and inspect your chainsaw in the process.
Chain Blade Direction
One of the first things you should know, is the direction in which the chain moves on a chainsaw, and how to tell if the chain is facing the correct direction.
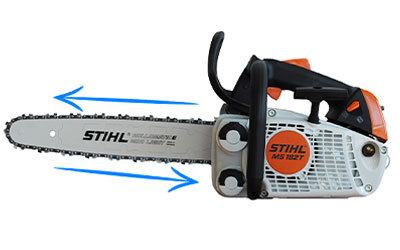
All chainsaws follow the same principle when it comes to how they cut through material. Most, if not all chainsaws move the chain in a loop, away from the user along the topside of what’s known as the guide bar, back around towards them along the underside of the guide bar.
What this means, is that the chain is only capable of cutting through the material in one direction. So if the topside of the chain saw is used, debris is thrown away from the user, while it would be flung towards the user if the underside was to be used instead.
The direction the chain moves can not be changed or reversed. So it is very important to make sure that the chain is facing the correct direction when it is installed.
What Is the Correct Direction to Face a Chain?
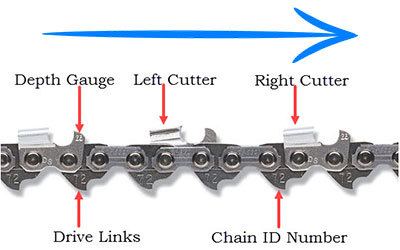
On the chain itself, you will notice that the drive links all curve in the same direction. In most cases, this can be used as an indication of which way to face the chain, but we can not guarantee that this will work for all brands of chains available or to come in the future.
What we recommend is for you to look for the sharp tip itself. Not all chains have a depth gauge as shown in the image above, but the blades will all have one side that’s sharp, and one side that’s blunt. It’s the sharp side that needs to be facing in the direction that the chain will be traveling.
What Would Happen if the Chain Was Put on Backwards?
The chainsaw wouldn’t be able to cut through hard material for starters. Additionally, you run the risk of the chain jamming up or falling off of the guide bar. Worst-case scenario, a blade could break off, or the chain could snap, which has the potential to send shrapnel flying back at you.
How to Remove a Chainsaw Chain
Before you replace the chain, swap out the guide bar, or disassemble the chainsaw to give it a thorough cleaning and inspection. You will first need to remove the existing chain.
Step 1) Make Sure the Chainsaw Is Off
As silly as this may sound, it is something that we must mention. For gas-powered chainsaws, this isn’t so much of an issue as you can easily tell that the chainsaw is running. But for electric saws, it can be easy to forget if they are powered up or not.
Every year there are many accidents that are caused by people accidentally starting the chain rotation of their electric saws. To effectively avoid this, disconnect the saw from its power source. This means removing the battery for cordless saws and disconnecting the power cord for corded saws.
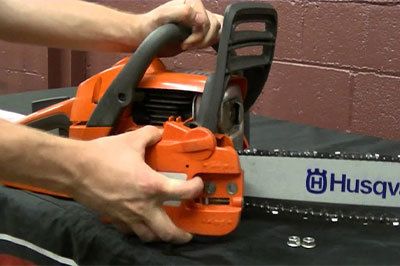
Step 2) Removing the Side Cover

Before removing the side cover, ensure that the chain brake is disengaged. As some models will have the chain brake lever attached to the side cover, it could be difficult, if not impossible, to put the side cover back on for these types of chainsaws, if the side cover was removed while the chain brake was engaged.
- Loosen the securing nuts that are holding the side cover in place. Before taking the nuts off, loosen the tensioner to make the chain slack.
- The tensioner could be found near the nuts, on top of the chainsaw, or even on the other side of the guide arm. Check your user manual for the exact location on the model you are using.
- Now remove the nuts, and take the side cover off.
Step 3) Removing the Chain
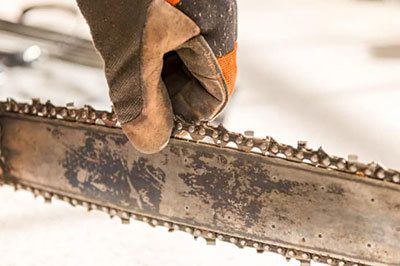
Chains are sharp and can easily cut through skin if you are not careful. You may want to wear a pair of thick protective gloves if you are not feeling very confident handling a chain.
- Grip a section of the chain that is along the top of the guide bar, and lift and pull it towards the nose of the guide bar; pulling it off as it rounds the upper tip of the bar.
- When the chain pulls away from the guide bar, pull the chain towards you, and then back down the length of the guide bar, and off of the sprocket/clutch assembly.
- The chain should come off cleanly, without any obstructions. If for some reason the chain does jam up, don’t try to force it off. Have a look to see where the chain is getting jammed, and see what needs to be done to free the chain. It could be a kink in the guide bar, or it could be caught on some form of chain guard or narrow clearance that could be part of the chainsaw’s design.
And that’s it, by loosening the tensioner and removing the side cover, you are able to remove the chain from the guide bar.
Cleaning the Saw and Replacing the Guide Bar
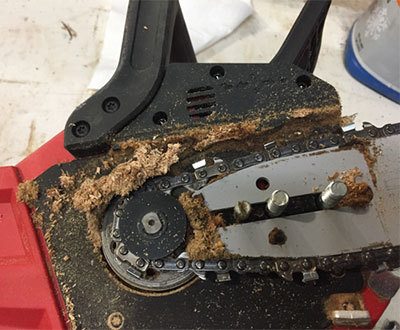
With the chain successfully removed, you will be able to clear away any debris that may have built up under the side cover and in or around the guide bar.
Inspect the Clutch Assembly
- Does the sprocket need to be replaced?
- Is there any excessive wear and tear, or rust buildup?
- Do you need to regrease the fittings?
If the answer is yes, then clean, regrease, or replace as needed.
Inspect the Guide Bar
Detach the guide bar and inspect it for any damage. This could include, but is not limited to:
- Bending
- Cracking
- Dents pinching in the guide groove
- Rust
Also, take the time to give the guide grooves and oil holes a clean. If there isn’t much chain oil present on the guide bar, check the oil reservoir to make sure that you have oil in the system. If there’s plenty of oil, have a look at the feeding hose/tube, there may be a blockage.
Replacing or Upgrading the Guide Bar
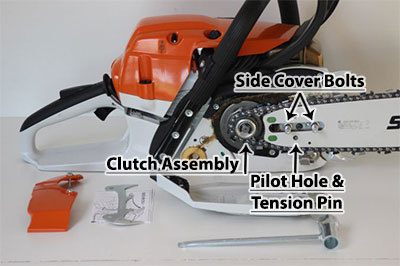
Reattaching or replacing the guide bar is pretty straight forward. All it involves is for you to slot the bar onto the side cover bolts. Just be sure not to align the tensioner pin on the chainsaw with the appropriate pilot hole on the guide bar.
Replacing the Chain
There are many different types of chains that you could use. Just be sure to use a chain that is the correct size for the guide bar you are using, and is the correct type for the material you will be cutting.
Step 1) Face the Chain the Right Way
Using the methods we mentioned at the beginning of the article, make sure that blades of the chain are facing the same direction that the chain will be traveling.
Step 2) Attach the New Chain
Loop the chain over the clutch assembly first, and test that the sprocket has engaged the chain. You can do this by holding the chain to the opposite side this will apply enough tension, and giving the clutch assembly a little turn back and forth to see if the chain moves with it.
Connect the chain to the chain bar by slotting the drive links into the groove along the topside and down the front of the guide bar.
Pull the guide bar forward to apply the tension to the chain, and to realign the tensioner pin with the pilot hole, and snap it into place.
Step 3) Reattach the Side Cover
Replace the side cover and tighten the nuts by hand only. Do not use any tools to tighten the nuts at this point.
Step 4) Inspect the Chain
Check to make sure that the chain moves freely by pulling/pushing it along the guide bar.
If the chain does not move, check to confirm that the chain brake is disengaged, otherwise remove the side cover again and look for any obstructions. (Repeat step 1-3)
Step 5) Tensioning the Chain

Tighten the tensioner to take the slack out of the chain. You want the tension to be enough to be able to lift the chain off of the chain bar and have it snap back, but not enough to have the drive links lift more than halfway out of the guide groove.
It is just as important to have a correctly tensioned chain as it is to have a chain facing in the right direction. If the chain is too loose it can slip off of the guide bar, either becoming jammed up inside the side cover or flinging back at you causing serious injury. But if the chain is too tight, it will not have enough flex to deal with the pressure created when cutting through hard materials, and it could snap under the strain. Again running the risk of causing either damage to your chainsaw, or injuring yourself.
Step 6) Tighten the Nuts
With the chain correctly tensioned, and freely moveable, it’s time to secure the side cover back into place. Using the tool provided with the chainsaw, or your own choice of wrench, lift the guide bar by the nose with one hand and tighten the nuts with the other.
Tightening the nuts this way will help to ensure that the correct amount of tension is maintained on the chain at all times.
Step 7) Test the Safety Features
Never assume that everything is working fine and it’s ready to go. Before using the chainsaw again, test that the chain brake can be turned on and off properly, and make sure that you have enough chain oil in the reservoir.
Engage the chain brake, and start the chainsaw. With the chain brake now off, give the saw a few revs to see how the saw feels. If the chain is making slapping noises or sounds like its grinding against the guide bar, you might need to make some tension adjustments.
How to Adjust the Tension of a Chainsaw Chain
Adjusting the tension of the chain is not as involved as replacing the chain itself. All you need to do is to loosen the nuts holding the side cover in place, and then adjust the tensioner.
Do not try to adjust the tensioner while the side cover nuts are fastened tightly. Loosening them first will allow the guide bar to be moved backward and forward as the tensioner is adjusted.
With the corrections made, retighten the nuts on the side cover while holding the guide bar up by the nose. You may need to do this several times throughout the life of the chain. The more a chain is used, the more it will stretch, making it sit more loosely on the guide bar over time.
Final Thoughts
We hope that this has been an informative enough article to answer all of your questions regarding how to replace a chainsaw’s chain and guide bar, and how to correctly clean, inspect and maintain your chains.
For information on how to start up a chain saw, or how to correctly use them, please have a read of our How to Use a Chainsaw article.