- You are here:
- Home »
- Blog »
- How-To
- » How to Use an Electric Saw

How to Use an Electric Saw
There a several fundaments that are the same for all electrical power tools. So regardless of whether it may be a Hand saw or a Circular saw, or even a Miter saw, they all follow the same basic safety principles.
In this simple to read article, we will be covering how to correctly use each of these respective saws effectively. In addition, we will touch on the standard safety precautions that are needed for all electrical saws.
General Safety Precautions
Not all saws operate in the same manner. A miter saw, for instance, requires a solid stable surface for it to be operated safely and correctly. While a circular saw is more portable and is handheld during operation. What this means is that while the saws may have different functions and uses, they can still present the same risk of injury if mistreated or inappropriately handled.
Be Aware of the Blade
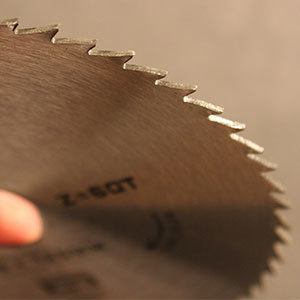
The main thing that all of these saws have in common, is that they all utilize an exposed blade that rips through hard materials. This blade is arguably the most dangerous feature on all saws. If you do not keep your body parts clear of the blade, it can and most likely will result in some form of bodily harm.
When a spinning blade meets flesh, the result could be anywhere from a small cut, right up to a served limb, or anything in between. For this reason, never put your hands anywhere near the blade while a power source is connected.
Removing the Blade
When you are replacing the blade of your saw, the first thing you need to do is disconnect the power source. Then you’ll need to make sure that you use the correct tools for undoing the fasteners.
Trying to use the wrong tool for the job, not only makes the task needless complicated, it also carries the risk of something going wrong. This could be as simple as your hand slipping, fingers getting pinched, or cutting your knuckles on a sharp edge.
If the saw has a safety lock that anchors the blade in place, be sure to use it. It is there for a reason, and it will make undoing the fasteners a much easier task.
Replacing the Blade
Once the blade has been removed, give that area of the saw a quick inspection to make sure that there are no obstructions, and to see if it needs to be cleaned, or reoiled.
Replacing a blade is a pretty straight forward process. Just be sure to have the teeth facing the right direction. If the blade is placed on backward, not only will the saw be unable to cut, it will kick back and may even blunt or break the blade if you tried to use it this way.
Power Sources
There are two types of power sources for electric saws, batteries for the cordless saws, and direct electricity for the corded saws.
Damaged batteries will generally not work properly. They may only hold a limited charge, or fail to provide any power at all. So the risk of personal injury associated with batteries is rather limited. Just be sure to check out the safety information for the particular batteries that you are using.
Corded saws, on the other hand, can actually present problems of their own. Besides being considered a trip hazard on many construction sites, using a faulty power cord could lead to injury. It is advisable to avoid using cords that are frayed or with exposed wires. Frayed cords are a potential fire hazard, and pose a risk of causing electrical shock.
One of the most common mistakes that corded electric saw users make, is not keeping their power cords clear of their cutting area. As silly as it may sound, there have been many people that became so engrossed in their work, that they didn’t even notice that they’ve just cut right through their own power cord.
Disconnect the Saw From Its Power Source When Done
Never store or leave an electric saw unattended while it’s still connected to a power source. This will prevent the saw from being accidentally triggering when someone needs to move it, or if kids were to get their hands on it.
Make Sure It’s Switched Off Entirely
One finally safety precaution to be mindful of, is to do with the on/off switch, flip, or button. Ever seen a movie or show where someone powers up a tool, only for it to run away on them?
Well, believe it or not, it can actually happen. This is something that can occur more often with older tools that don’t have modern safety latches or tools that have a simple on/off toggle switch.
To avoid causing an injury, damaging your tools, or ruining your materials; confirm that the saw has indeed been switched off, and don’t leave the blade resting against a surface that it could use to kick-off of.
Safety Equipment

All power tools require a standard array of Personal Protective Equipment or PPE, and electric saws are no different. They create a lot of noise and dust, so you will need to use the appropriate PPE regardless of the electric saw you are using.
- Googles or similar eye protection
- Earmuffs or earplugs
- Dust mask
- Gloves are preferable
- Avoid wearing loose-fitting clothing
How to Use an Electric Circular Saw

Alongside a drill, the humble circular saw is one of the most common power tools that can be found in both a novices and professionals tool kit. They can cut through a strip of timber like a hot knife through butter.
Different models have the blade positioned on either the left or right-hand side of the saw. They can also have different adjustments and guideline indicators. So The first thing you need to do is familiarize yourself with the particular model that you are using.
Despite the differences that can be found in the different circular saws, model to model, every circular saw still pretty much operates in the same manner.
Secure the Material
When using a circular saw, you will be applying pressure in two directions
- Forwards – as you guide the blade through the material you are cutting.
- Downwards – as you hold the saw down in a firm grip to prevent it from kicking back up at you.
To help prevent the material from moving around as you cut, or from tipping over as you hold the circular saw down; counterbalances and anchors need to be taken into consideration.
Thin sheets of timber move around a lot less as they provide little to no resistance to being sliced through. Thicker material, on the other hand, resists being cut through a lot more. So be sure to take the thickness, size, and composition of the materials you are cutting into account.
If you are only cutting a small section off of the long strip of wood, the weight of the wood will be at the longer end, and therefore less likely to tip over.
If you are cutting a long strip through the center, you will need to support both ends of the material to help prevent one side from flipping over, or the material from sagging, which can result in a poor quality cut.
Here are a few things you may need to help balance and or secure your material in place when using a circular saw.
- G Clamps
- Weights
Measure Twice and Cut Once
Making sure you know where you need to make your cut is the first thing that you need to make sure you get right. You can cut freehand, that is without a fence to guide your saw, or with a fence that can help you to achieve a straight cut.
On the base plate, sometimes known as a shoe, there will be a guide marker that can be seen on the front end of the plate. This line, notch, or light beam, indicates where the inside edge of the blade is situated. As different types of blades can have different thicknesses, the position of the outside edge of the blade can change, but the inside edge will remain the same regardless of which blade is used.
Freehanding
Freehanding your cuts requires that you position the saw so that the inside edge of the blade, that is the side of the saw with the motor, is on the same side as the length of material you wish to cut. If you position the saw so that the motor is on the other side, your cut would reduce the length of your measurement by the thickness of the blade.
Using a Fence (Guide)
Some circular saws will let you know where the inside edge of the blade is, in relation to the edges of the base plate. Circular saws like this actually allow you to add, or even subtract this measurement to the length you desire. Using this new measurement will allow you to set up a fence, or guide, for the circular saw to follow.
Just be sure to take note of which side of the plate the measurement is indicating. Some saws are designed so that a fence can only be used along one side of the plate. Other saws can have fences used on either side of the plate.
Set Your Bevel
You can adjust the angle of the blade to change the angle of the cutting edge. A standard straight cut is made with the blade at 90°. Depending on the model you are using, you may be able to adjust the angle of the blade by up to 45°, or even 135°.
If your circular saw is capable of having its bevel adjusted, you will notice an additional guide marker or two. These are to indicate where the front side edge of the cut can be made. The guide marker may adjust with the blade, or there may only be indicators for 45°, 90°, and even possibly 135°.
Making Your Cut
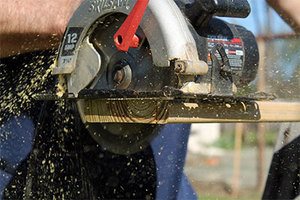
With your material secured in place, and measurements marked out, it’s time to start cutting. You will notice that on the underside of the saw, there is a blade cover. This is to help prevent any nasty accidents from occurring should you accidentally touch the blade before it stops spinning.
Don’t worry, the guard will retract as the saw glides through the material it is cutting and will snap back into place once the saw has been lifted up off of the project.
Here is the process to follow for starting your cut:
- Position the saw in line with where you need to start making your cut.
- The base plate needs to be resting flat on the surface of the material you are ripping.
- It is important that the blade itself, is neither pressed up against the material nor being obstructed by anything else, this includes the power cord.
- Squeeze the on/off trigger and wait for the blade to reach full RMP. There may be a safety latch on your trigger, so if the button doesn’t budge, look for this release.
- With the saw at full power, gently guide the blade into the material.
- Do not force the saw through, it needs to glide through under its own power. If you push too hard, you can jam the saw. If you hold it back, you can burn the edges of your cut.
- While making your cut, you need to keep the base plate flat against the surface of the material. Not only will this help you to maintain better control over the saw, it also helps to guarantee a better cut.
- When you have finished your cut, release the trigger and allow the blade to come to a halt on its own.
And that’s it. The more practice you get with using a circular saw, the less likely you’ll need to rely on fences to help ensure that straight and perfect cut.
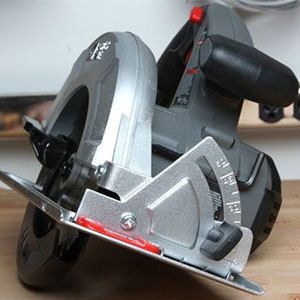
How to Use an Electric Mitre Saw
Unlike other electric saws that are highly mobile and able to be pulled out when needed; miter saws require foresight and a little planning. The miter saw needs to set up in an area that is both safe and comfortable for it to be used in, as well as accessible.
Before you start powering up a miter saw, the very first thing you need to do is to make sure that the saw is being placed on an appropriate surface. The surface needs to be stable and solid enough to support the weight of the saw, plus the material, and the force being applied by the saw as it rips through the material you are cutting.
For example, setting up your miter saw on the sand at the beach can be acceptable, but cutting material onto a pile of sand at a construction site is not.
Also, try to ensure that the hight that the material will be entering the miter saw at, is as close to level with the saw as it can possibly be. If the angles between the material supports and the saw are different, it is hard to guarantee a straight cut.
Here are some of the biggest mistakes people have made when setting up their miter saw:
- Using the saw on a trolly or cart that doesn’t have wheel locks.
- Not having enough clearance to line up the material properly.
- Not leaving enough room to cut the material at the correct lengths.
- Cutting material in bulk at an uncomfortable hight, for a prolonged period of time.
- Being too far away from the power source, thus requiring a long extension cord to be dragged through the work area.
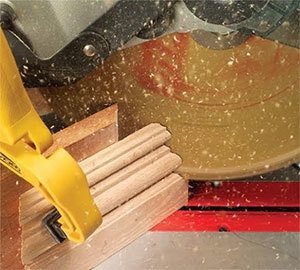
Securing the Material
There are many reasons why you may want to secure your material in place before you start cutting. It could be as a safety precaution, to help prevent a heavy length of material from shifting as you cut, or to help improve productivity.
If you are cutting lots of lengths out of smaller thicknesses, it can be more efficient to cut multiple lengths of material at the same time. By using a clamp or vise to bundle up and hold the material in place, factory workers are able to produce multiple lengths in a single cut.
Then there’s the issue of positioning the material for an angled cut, or when you need to cut slippery or round materials. If you have to hold the material in place as you work, it could slip out of your grip and cause you an injury. This is why many worksites require the use of some form of securing mechanism when using miter saws.
If you need to use something to hold your material in place as you work, we’d recommend having a look for something similar to the following:
Setting Up a Stop For Multiple Cuts
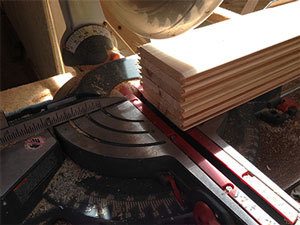
For those pesky tasks where you’ll need to cut multiple pieces at the same length, you can use whats called a stop. Simply put, a stop is an object that has been secured in place, to prevent material from being moved any further than desired.
What this means, is that when the material is pushed up against the stop, it will be cut at the exact same length as every other cut made before it, if done properly that is.
Almost any solid material can be used as a stop, it just needs a way to be secured into place. In truth, you could even use a brick wall as a stop if you wanted to. But a more ideal stop would be something that you could more easily fine-tune to as much of a fraction of an inch as you desire.
There are a few different methods that people like to use to set up their stops:
- You can measure and cut one piece, clean it up and then butt it up against the blade, before positioning and securing the stop in place.
- You can measure up your material and position it under the blade ready to be cut. Before cutting the piece, however, you can butt the stop up against the material and secure it in place.
- To use a wall as a stop, place the material under the blade in the correct position, and simply bring the miter saw closer to the wall until the material and the wall are touching.
- If you have a sample piece, you can forgo the need to measure, and just use the sample to set the stop in place, by butting the sample against the blade, and the stop against the sample.
Adjusting Your Miter Saw
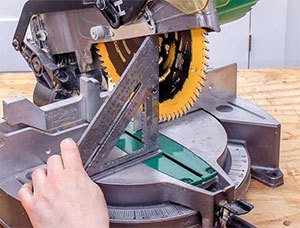
The difference between a standard miter saw and a drop saw is that drop saws can only make straight 90° angled cuts; whereas miter saws can make angled miter cuts from 45° up to 135°.
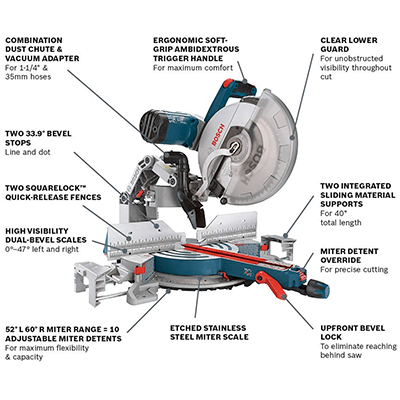
Then there are miter saws like the Bosch GCM12SD Dual-Bevel Miter Saw, that are capable of adjusting both the bevel angle of the blade itself and the miter angle of the cut being made.
To adjust your miter saw, you’ll need to familiarize yourself with the particular model that you are using. Most miter saws will have the miter lock situated near the front of the base. It could be a twisting nob or even a lever.
By loosening the lock, the arm of the saw can be angled to the left or right in relation to the fence. As the arm is turned, a guide mark on the base will turn with it, indicating the current miter angle of the cut. Line up the guide mark indicator with the angle you require, and tighten the lock to secure the arm in place.
If you happen to be using a smaller hobby miter saw, like the Proxxon 37160 KGS 80 MICRO Chop Saw, the base itself is what will be moving left or right, not the arm.
Measuring Out Your Cuts
The thing to remember when making a miter cut is that they offer two different points of measurement. There’s the shorter inside measurement and the longer outside measurement.
Sounds simple enough to measure out, right?
Well, the measurement you will use, all depends on how you intend to use the piece that has been cut.
To make a frame that will fit inside an opening, such as a new window frame. You need to use the inside measurement of the opening to determine the outside length of your miter cut.
To make a frame that will fit snuggly around an object, such as a picture frame. You will need to take the outside measurement of the object, to determine the inside measurement of your cut.
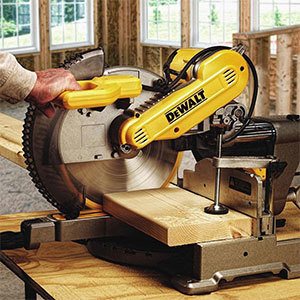
Making Your Cut
On the handgrip, you can find 2 buttons. One is the trigger to start the saw blade up, the other is a release button. If the release button has not been pressed, the on/off trigger can not be used.
As the arm lowers, the blade guard is pulled back on its own. The more the arm is lowered, the further the guard is pulled back. As the arm is raised, the guard will begin to lower itself again.
With your material measured up, and positioned to be cut. Grip the handle, release the button lock and squeeze the on/off trigger.
Gently lower the saw blade onto the material, and guide it down until it has cut all the way through. Release the on/off trigger and guide the arm back up yourself.
Do not let go of the arm unless you absolutely must. If the arm is allowed to fly back up on its own, it could end up wearing down the joints, or breaking the arm itself.